Getting Started

Build a User Management App with refine

This tutorial demonstrates how to build a basic user management app. The app authenticates and identifies the user, stores their profile information in the database, and allows the user to log in, update their profile details, and upload a profile photo. The app uses:

  • Supabase Database - a Postgres database for storing your user data and Row Level Security so data is protected and users can only access their own information.
  • Supabase Auth - users log in through magic links sent to their email (without having to set up passwords).
  • Supabase Storage - users can upload a profile photo.
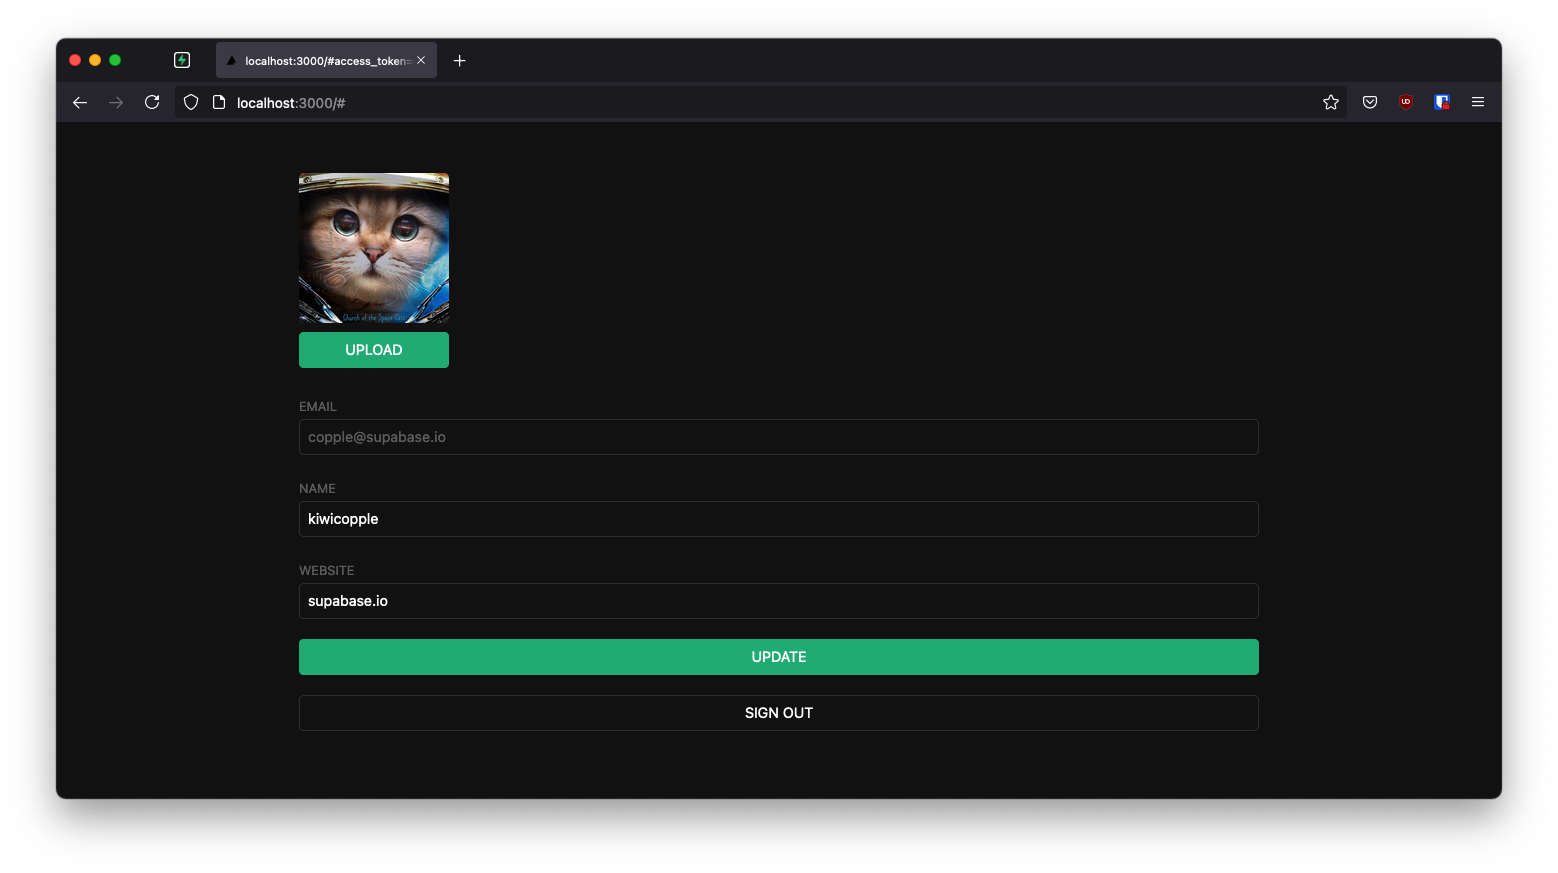
Supabase User Management example

About refine

refine is a React-based framework used to rapidly build data-heavy applications like admin panels, dashboards, storefronts and any type of CRUD apps. It separates app concerns into individual layers, each backed by a React context and respective provider object. For example, the auth layer represents a context served by a specific set of authProvider methods that carry out authentication and authorization actions such as logging in, logging out, getting roles data, etc. Similarly, the data layer offers another level of abstraction that is equipped with dataProvider methods to handle CRUD operations at appropriate backend API endpoints.

refine provides hassle-free integration with Supabase backend with its supplementary @refinedev/supabase package. It generates authProvider and dataProvider methods at project initialization, so we don't need to expend much effort to define them ourselves. We just need to choose Supabase as our backend service while creating the app with create refine-app.

Project setup

Before we start building we're going to set up our Database and API. This is as simple as starting a new Project in Supabase and then creating a "schema" inside the database.

Create a project

  1. Create a new project in the Supabase Dashboard.
  2. Enter your project details.
  3. Wait for the new database to launch.

Set up the database schema

Now we are going to set up the database schema. We can use the "User Management Starter" quickstart in the SQL Editor, or you can just copy/paste the SQL from below and run it yourself.

Get the API Keys

Now that you've created some database tables, you are ready to insert data using the auto-generated API. We just need to get the Project URL and anon key from the API settings.

  1. Go to the API Settings page in the Dashboard.
  2. Find your Project URL, anon, and service_role keys on this page.

Building the app

Let's start building the refine app from scratch.

Initialize a refine app

We can use create refine-app command to initialize an app. Run the following in the terminal:


_10
npm create refine-app@latest -- --preset refine-supabase

In the above command, we are using the refine-supabase preset which chooses the Supabase supplementary package for our app. We are not using any UI framework, so we'll have a headless UI with plain React and CSS styling.

The refine-supabase preset installs the @refinedev/supabase package which out-of-the-box includes the Supabase dependency: supabase-js.

We also need to install @refinedev/react-hook-form and react-hook-form packages that allow us to use React Hook Form inside refine apps. Run:


_10
npm install @refinedev/react-hook-form react-hook-form

With the app initialized and packages installed, at this point before we begin discussing refine concepts, let's try running the app:


_10
cd app-name
_10
npm run dev

We should have a running instance of the app with a Welcome page at http://localhost:5173.

Let's move ahead to understand the generated code now.

Refine supabaseClient

The create refine-app generated a Supabase client for us in the src/utility/supabaseClient.ts file. It has two constants: SUPABASE_URL and SUPABASE_KEY. We want to replace them as supabaseUrl and supabaseAnonKey respectively and assign them our own Supabase server's values.

We'll update it with environment variables managed by Vite:

src/utility/supabaseClient.ts

_13
import { createClient } from '@refinedev/supabase'
_13
_13
const supabaseUrl = import.meta.env.VITE_SUPABASE_URL
_13
const supabaseAnonKey = import.meta.env.VITE_SUPABASE_ANON_KEY
_13
_13
export const supabaseClient = createClient(supabaseUrl, supabaseAnonKey, {
_13
db: {
_13
schema: 'public',
_13
},
_13
auth: {
_13
persistSession: true,
_13
},
_13
})

And then, we want to save the environment variables in a .env.local file. All you need are the API URL and the anon key that you copied earlier.

.env.local

_10
VITE_SUPABASE_URL=YOUR_SUPABASE_URL
_10
VITE_SUPABASE_ANON_KEY=YOUR_SUPABASE_ANON_KEY

The supabaseClient will be used in fetch calls to Supabase endpoints from our app. As we'll see below, the client is instrumental in implementing authentication using Refine's auth provider methods and CRUD actions with appropriate data provider methods.

One optional step is to update the CSS file src/App.css to make the app look nice. You can find the full contents of this file here.

In order for us to add login and user profile pages in this App, we have to tweak the <Refine /> component inside App.tsx.

The <Refine /> Component

The App.tsx file initially looks like this:

src/App.tsx

_40
import { Refine, WelcomePage } from '@refinedev/core'
_40
import { RefineKbar, RefineKbarProvider } from '@refinedev/kbar'
_40
import routerBindings, {
_40
DocumentTitleHandler,
_40
UnsavedChangesNotifier,
_40
} from '@refinedev/react-router-v6'
_40
import { dataProvider, liveProvider } from '@refinedev/supabase'
_40
import { BrowserRouter, Route, Routes } from 'react-router-dom'
_40
_40
import './App.css'
_40
import authProvider from './authProvider'
_40
import { supabaseClient } from './utility'
_40
_40
function App() {
_40
return (
_40
<BrowserRouter>
_40
<RefineKbarProvider>
_40
<Refine
_40
dataProvider={dataProvider(supabaseClient)}
_40
liveProvider={liveProvider(supabaseClient)}
_40
authProvider={authProvider}
_40
routerProvider={routerBindings}
_40
options={{
_40
syncWithLocation: true,
_40
warnWhenUnsavedChanges: true,
_40
}}
_40
>
_40
<Routes>
_40
<Route index element={<WelcomePage />} />
_40
</Routes>
_40
<RefineKbar />
_40
<UnsavedChangesNotifier />
_40
<DocumentTitleHandler />
_40
</Refine>
_40
</RefineKbarProvider>
_40
</BrowserRouter>
_40
)
_40
}
_40
_40
export default App

We'd like to focus on the <Refine /> component, which comes with several props passed to it. Notice the dataProvider prop. It uses a dataProvider() function with supabaseClient passed as argument to generate the data provider object. The authProvider object also uses supabaseClient in implementing its methods. You can look it up in src/authProvider.ts file.

Customize authProvider

If you examine the authProvider object you can notice that it has a login method that implements a OAuth and Email / Password strategy for authentication. We'll, however, remove them and use Magic Links to allow users sign in with their email without using passwords.

We want to use supabaseClient auth's signInWithOtp method inside authProvider.login method:


_20
login: async ({ email }) => {
_20
try {
_20
const { error } = await supabaseClient.auth.signInWithOtp({ email });
_20
_20
if (!error) {
_20
alert("Check your email for the login link!");
_20
return {
_20
success: true,
_20
};
_20
};
_20
_20
throw error;
_20
} catch (e: any) {
_20
alert(e.message);
_20
return {
_20
success: false,
_20
e,
_20
};
_20
}
_20
},

We also want to remove register, updatePassword, forgotPassword and getPermissions properties, which are optional type members and also not necessary for our app. The final authProvider object looks like this:

src/authProvider.ts

_91
import { AuthBindings } from '@refinedev/core'
_91
_91
import { supabaseClient } from './utility'
_91
_91
const authProvider: AuthBindings = {
_91
login: async ({ email }) => {
_91
try {
_91
const { error } = await supabaseClient.auth.signInWithOtp({ email })
_91
_91
if (!error) {
_91
alert('Check your email for the login link!')
_91
return {
_91
success: true,
_91
}
_91
}
_91
_91
throw error
_91
} catch (e: any) {
_91
alert(e.message)
_91
return {
_91
success: false,
_91
e,
_91
}
_91
}
_91
},
_91
logout: async () => {
_91
const { error } = await supabaseClient.auth.signOut()
_91
_91
if (error) {
_91
return {
_91
success: false,
_91
error,
_91
}
_91
}
_91
_91
return {
_91
success: true,
_91
redirectTo: '/',
_91
}
_91
},
_91
onError: async (error) => {
_91
console.error(error)
_91
return { error }
_91
},
_91
check: async () => {
_91
try {
_91
const { data } = await supabaseClient.auth.getSession()
_91
const { session } = data
_91
_91
if (!session) {
_91
return {
_91
authenticated: false,
_91
error: {
_91
message: 'Check failed',
_91
name: 'Session not found',
_91
},
_91
logout: true,
_91
redirectTo: '/login',
_91
}
_91
}
_91
} catch (error: any) {
_91
return {
_91
authenticated: false,
_91
error: error || {
_91
message: 'Check failed',
_91
name: 'Not authenticated',
_91
},
_91
logout: true,
_91
redirectTo: '/login',
_91
}
_91
}
_91
_91
return {
_91
authenticated: true,
_91
}
_91
},
_91
getIdentity: async () => {
_91
const { data } = await supabaseClient.auth.getUser()
_91
_91
if (data?.user) {
_91
return {
_91
...data.user,
_91
name: data.user.email,
_91
}
_91
}
_91
_91
return null
_91
},
_91
}
_91
_91
export default authProvider

Set up a login component

We have chosen to use the headless refine core package that comes with no supported UI framework. So, let's set up a plain React component to manage logins and sign ups.

Create and edit src/components/auth.tsx:

src/components/auth.tsx

_38
import { useState } from 'react'
_38
import { useLogin } from '@refinedev/core'
_38
_38
export default function Auth() {
_38
const [email, setEmail] = useState('')
_38
const { isLoading, mutate: login } = useLogin()
_38
_38
const handleLogin = async (event: { preventDefault: () => void }) => {
_38
event.preventDefault()
_38
login({ email })
_38
}
_38
_38
return (
_38
<div className="row flex flex-center container">
_38
<div className="col-6 form-widget">
_38
<h1 className="header">Supabase + refine</h1>
_38
<p className="description">Sign in via magic link with your email below</p>
_38
<form className="form-widget" onSubmit={handleLogin}>
_38
<div>
_38
<input
_38
className="inputField"
_38
type="email"
_38
placeholder="Your email"
_38
value={email}
_38
required={true}
_38
onChange={(e) => setEmail(e.target.value)}
_38
/>
_38
</div>
_38
<div>
_38
<button className={'button block'} disabled={isLoading}>
_38
{isLoading ? <span>Loading</span> : <span>Send magic link</span>}
_38
</button>
_38
</div>
_38
</form>
_38
</div>
_38
</div>
_38
)
_38
}

Notice we are using the useLogin() refine auth hook to grab the mutate: login method to use inside handleLogin() function and isLoading state for our form submission. The useLogin() hook conveniently offers us access to authProvider.login method for authenticating the user with OTP.

Account page

After a user is signed in we can allow them to edit their profile details and manage their account.

Let's create a new component for that in src/components/account.tsx.

src/components/account.tsx

_67
import { BaseKey, useGetIdentity, useLogout } from '@refinedev/core'
_67
import { useForm } from '@refinedev/react-hook-form'
_67
_67
interface IUserIdentity {
_67
id?: BaseKey
_67
username: string
_67
name: string
_67
}
_67
_67
export interface IProfile {
_67
id?: string
_67
username?: string
_67
website?: string
_67
avatar_url?: string
_67
}
_67
_67
export default function Account() {
_67
const { data: userIdentity } = useGetIdentity<IUserIdentity>()
_67
_67
const { mutate: logOut } = useLogout()
_67
_67
const {
_67
refineCore: { formLoading, queryResult, onFinish },
_67
register,
_67
control,
_67
handleSubmit,
_67
} = useForm<IProfile>({
_67
refineCoreProps: {
_67
resource: 'profiles',
_67
action: 'edit',
_67
id: userIdentity?.id,
_67
redirect: false,
_67
onMutationError: (data) => alert(data?.message),
_67
},
_67
})
_67
_67
return (
_67
<div className="container" style={{ padding: '50px 0 100px 0' }}>
_67
<form onSubmit={handleSubmit(onFinish)} className="form-widget">
_67
<div>
_67
<label htmlFor="email">Email</label>
_67
<input id="email" name="email" type="text" value={userIdentity?.name} disabled />
_67
</div>
_67
<div>
_67
<label htmlFor="username">Name</label>
_67
<input id="username" type="text" {...register('username')} />
_67
</div>
_67
<div>
_67
<label htmlFor="website">Website</label>
_67
<input id="website" type="url" {...register('website')} />
_67
</div>
_67
_67
<div>
_67
<button className="button block primary" type="submit" disabled={formLoading}>
_67
{formLoading ? 'Loading ...' : 'Update'}
_67
</button>
_67
</div>
_67
_67
<div>
_67
<button className="button block" type="button" onClick={() => logOut()}>
_67
Sign Out
_67
</button>
_67
</div>
_67
</form>
_67
</div>
_67
)
_67
}

Notice above that, we are using three refine hooks, namely the useGetIdentity(), useLogOut() and useForm() hooks.

useGetIdentity() is a auth hook that gets the identity of the authenticated user. It grabs the current user by invoking the authProvider.getIdentity method under the hood.

useLogOut() is also an auth hook. It calls the authProvider.logout method to end the session.

useForm(), in contrast, is a data hook that exposes a series of useful objects that serve the edit form. For example, we are grabbing the onFinish function to submit the form with the handleSubmit event handler. We are also using formLoading property to present state changes of the submitted form.

The useForm() hook is a higher-level hook built on top of Refine's useForm() core hook. It fully supports form state management, field validation and submission using React Hook Form. Behind the scenes, it invokes the dataProvider.getOne method to get the user profile data from our Supabase /profiles endpoint and also invokes dataProvider.update method when onFinish() is called.

Launch!

Now that we have all the components in place, let's define the routes for the pages in which they should be rendered.

Add the routes for /login with the <Auth /> component and the routes for index path with the <Account /> component. So, the final App.tsx:

src/App.tsx

_54
import { Authenticated, Refine } from '@refinedev/core'
_54
import { RefineKbar, RefineKbarProvider } from '@refinedev/kbar'
_54
import routerBindings, {
_54
CatchAllNavigate,
_54
DocumentTitleHandler,
_54
UnsavedChangesNotifier,
_54
} from '@refinedev/react-router-v6'
_54
import { dataProvider, liveProvider } from '@refinedev/supabase'
_54
import { BrowserRouter, Outlet, Route, Routes } from 'react-router-dom'
_54
_54
import './App.css'
_54
import authProvider from './authProvider'
_54
import { supabaseClient } from './utility'
_54
import Account from './components/account'
_54
import Auth from './components/auth'
_54
_54
function App() {
_54
return (
_54
<BrowserRouter>
_54
<RefineKbarProvider>
_54
<Refine
_54
dataProvider={dataProvider(supabaseClient)}
_54
liveProvider={liveProvider(supabaseClient)}
_54
authProvider={authProvider}
_54
routerProvider={routerBindings}
_54
options={{
_54
syncWithLocation: true,
_54
warnWhenUnsavedChanges: true,
_54
}}
_54
>
_54
<Routes>
_54
<Route
_54
element={
_54
<Authenticated fallback={<CatchAllNavigate to="/login" />}>
_54
<Outlet />
_54
</Authenticated>
_54
}
_54
>
_54
<Route index element={<Account />} />
_54
</Route>
_54
<Route element={<Authenticated fallback={<Outlet />} />}>
_54
<Route path="/login" element={<Auth />} />
_54
</Route>
_54
</Routes>
_54
<RefineKbar />
_54
<UnsavedChangesNotifier />
_54
<DocumentTitleHandler />
_54
</Refine>
_54
</RefineKbarProvider>
_54
</BrowserRouter>
_54
)
_54
}
_54
_54
export default App

Let's test the App by running the server again:


_10
npm run dev

And then open the browser to localhost:5173 and you should see the completed app.
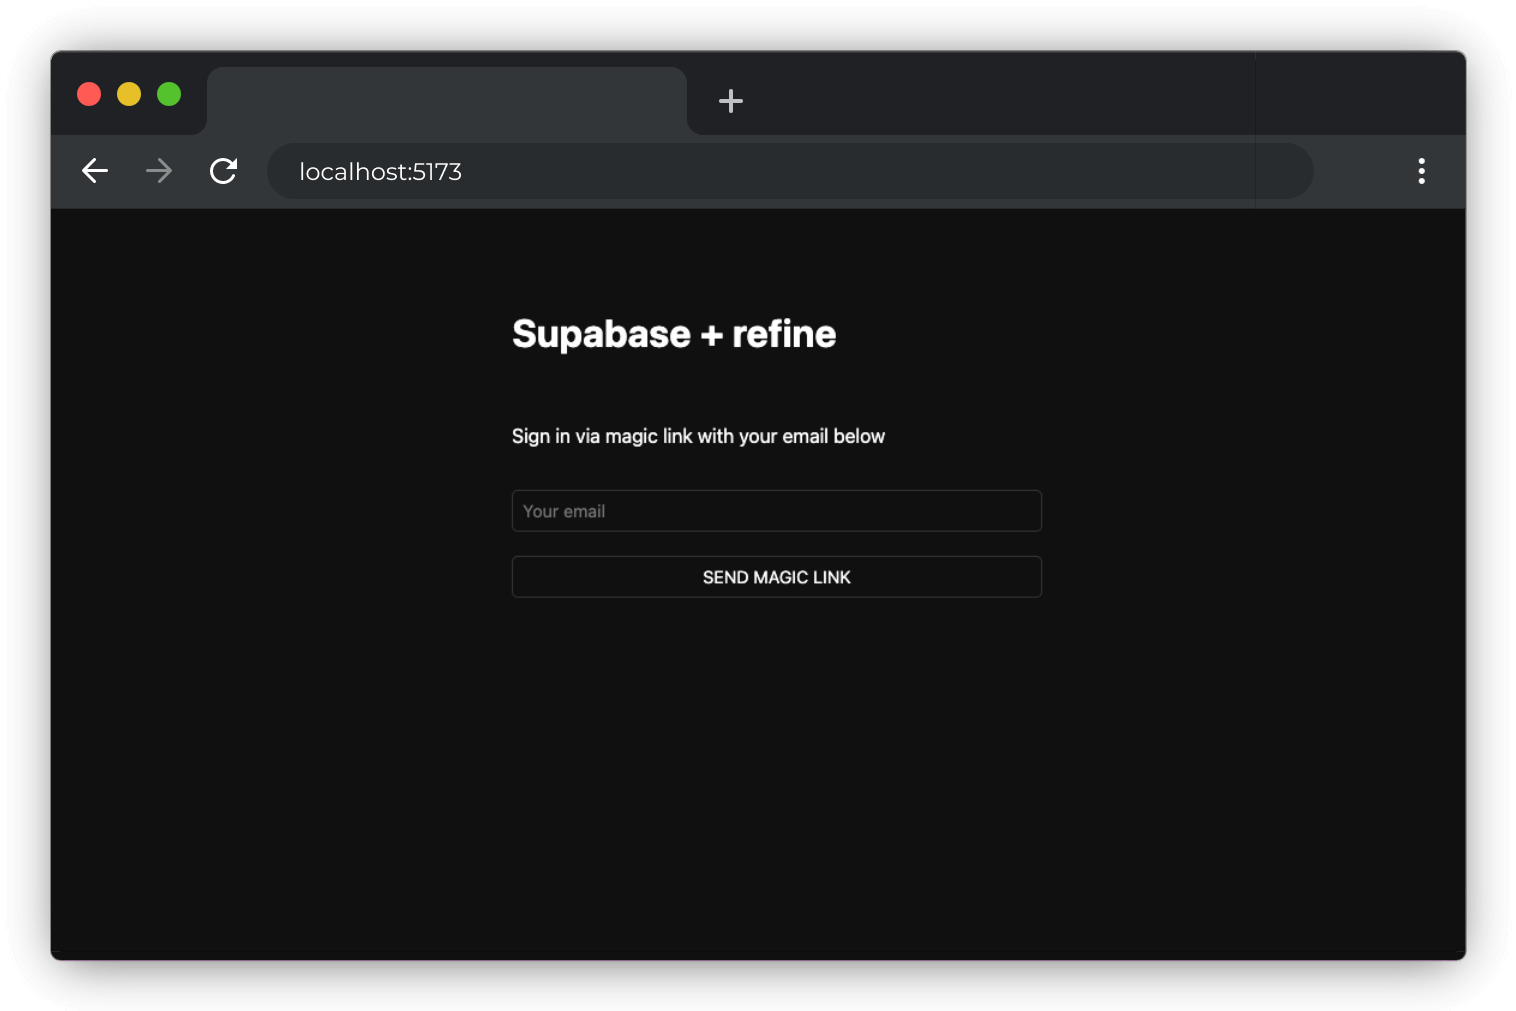
Supabase refine

Bonus: Profile photos

Every Supabase project is configured with Storage for managing large files like photos and videos.

Create an upload widget

Let's create an avatar for the user so that they can upload a profile photo. We can start by creating a new component:

Create and edit src/components/avatar.tsx:

src/components/avatar.tsx

_90
import { useEffect, useState } from 'react'
_90
import { supabaseClient } from '../utility/supabaseClient'
_90
_90
type TAvatarProps = {
_90
url?: string
_90
size: number
_90
onUpload: (filePath: string) => void
_90
}
_90
_90
export default function Avatar({ url, size, onUpload }: TAvatarProps) {
_90
const [avatarUrl, setAvatarUrl] = useState('')
_90
const [uploading, setUploading] = useState(false)
_90
_90
useEffect(() => {
_90
if (url) downloadImage(url)
_90
}, [url])
_90
_90
async function downloadImage(path: string) {
_90
try {
_90
const { data, error } = await supabaseClient.storage.from('avatars').download(path)
_90
if (error) {
_90
throw error
_90
}
_90
const url = URL.createObjectURL(data)
_90
setAvatarUrl(url)
_90
} catch (error: any) {
_90
console.log('Error downloading image: ', error?.message)
_90
}
_90
}
_90
_90
async function uploadAvatar(event: React.ChangeEvent<HTMLInputElement>) {
_90
try {
_90
setUploading(true)
_90
_90
if (!event.target.files || event.target.files.length === 0) {
_90
throw new Error('You must select an image to upload.')
_90
}
_90
_90
const file = event.target.files[0]
_90
const fileExt = file.name.split('.').pop()
_90
const fileName = `${Math.random()}.${fileExt}`
_90
const filePath = `${fileName}`
_90
_90
const { error: uploadError } = await supabaseClient.storage
_90
.from('avatars')
_90
.upload(filePath, file)
_90
_90
if (uploadError) {
_90
throw uploadError
_90
}
_90
onUpload(filePath)
_90
} catch (error: any) {
_90
alert(error.message)
_90
} finally {
_90
setUploading(false)
_90
}
_90
}
_90
_90
return (
_90
<div>
_90
{avatarUrl ? (
_90
<img
_90
src={avatarUrl}
_90
alt="Avatar"
_90
className="avatar image"
_90
style={{ height: size, width: size }}
_90
/>
_90
) : (
_90
<div className="avatar no-image" style={{ height: size, width: size }} />
_90
)}
_90
<div style={{ width: size }}>
_90
<label className="button primary block" htmlFor="single">
_90
{uploading ? 'Uploading ...' : 'Upload'}
_90
</label>
_90
<input
_90
style={{
_90
visibility: 'hidden',
_90
position: 'absolute',
_90
}}
_90
type="file"
_90
id="single"
_90
name="avatar_url"
_90
accept="image/*"
_90
onChange={uploadAvatar}
_90
disabled={uploading}
_90
/>
_90
</div>
_90
</div>
_90
)
_90
}

Add the new widget

And then we can add the widget to the Account page at src/components/account.tsx:

src/components/account.tsx

_37
// Import the new components
_37
import { Controller } from 'react-hook-form'
_37
import Avatar from './avatar'
_37
_37
// ...
_37
_37
return (
_37
<div className="container" style={{ padding: '50px 0 100px 0' }}>
_37
<form onSubmit={handleSubmit} className="form-widget">
_37
<Controller
_37
control={control}
_37
name="avatar_url"
_37
render={({ field }) => {
_37
return (
_37
<Avatar
_37
url={field.value}
_37
size={150}
_37
onUpload={(filePath) => {
_37
onFinish({
_37
...queryResult?.data?.data,
_37
avatar_url: filePath,
_37
onMutationError: (data: { message: string }) => alert(data?.message),
_37
})
_37
field.onChange({
_37
target: {
_37
value: filePath,
_37
},
_37
})
_37
}}
_37
/>
_37
)
_37
}}
_37
/>
_37
{/* ... */}
_37
</form>
_37
</div>
_37
)

At this stage, you have a fully functional application!